Thursday, March 29, 2012

More food pics

Another post with a few more food pics. =)


This was a new 'Mac 'n cheez' recipe I tried from Alicia C. Simpson's book 'Vegan Celebrations' but later found another post on Vegan Yum Yum's blog Mac and cheeze that is pretty similar.
I liked the dish, Hubby did as well, though he said he would never call the dish anything close to 'Mac and cheese' how an omni knows it... So maybe I should just call those kind of dishes 'noodle casserole' from now on!? ;)
Either way, it was super yummy!

Another great dish was made with tofu from Crescent Dragonwagon's  Passionate Vegetarian [I got my copy from the Amazon Marketplace for ~5$ incl. shipping!]
I'll see that I can post my adaptation of the recipe soon!


Together with quinoa and some green peas, a perfect dinner or lunch (leftovers!) =)


Monday, March 26, 2012

Random pics #2, Food


Pretty much self-explanatory ;-)

I absolutely *love* Lauren's (Vegan Yum Yum ) marinaded tofu recipe!

A typical lunch for me; some kind of spread (here 'Mock Tuna') on one of my own breads, some pickled artichoke hearts and sun dried tomatoes. (I didn't take pics of  the fruit that I usually eat afterwards as a dessert! ;) )

A vegan decadent chocolate cake I made for my Hubby  

Clearly an older pic, Christmas cookies...

...as well as Valentine's Day cookies =)

And a very recent one; last night's dinner. The infamous Chickpea cutlets (Isa's recipe in her Veganomicon) with mustard sauce. [The sauce looks a bit gooey here in the pic, it wasn't heated up enough when I took the pic...]

Random pics #1, Etna

Since I've been MIA for a bit, I just wanted to show a few pics today! 
To keep it organized, I'll post the food pics in a separate post! =) 

Mt.Etna being active again!
(I took the pic when I brought my kids to the bus stop; this is the view from our street!)

The following are not my pics but taken at the same day/morning!


Pretty impressive, isn't 'she'!?
I will say, as much as I could name tons of things that I don't like about living here.. the view of Mt.Etna's eruptions will always fascinate me! ;)


Sunday, March 25, 2012

My weekly challenge...

...is to pick a cookbook for the next week's menu plan!
I'll be honest, to this day I'm struggling with coming up with a full menu sometimes as I just feel soo overwhelmed by the choices of my cookbooks, which I cherish each and every one!!! (And you can't even see my 3 big Din A4 folders full with printed recipes from other bloggers & websites! *lol*)


The past 2 weeks I've been using Lindsay's Happy Herbivore to cook and bake from; this week I'm picking...
I don't know yet! I'll have to think about it! LOL
You'll see once I start posting recipes again! ;-)
[Tonight we had Isa's chickpea cutlets *yum*-which a very good online friend of mine and fellow blogger of Additive-Free Eats and I decided on both making 'together' today =) - so maybe I'll stick with a vegan classic, the Veganomicon...]

I'll keep you all posted! ^_^

Saturday, March 24, 2012

Bread machine recipes

Speaking of bread, I might as well share my favorite 
bread machine recipes. =)
They all came with the machine (Moulinex) itself and are really easy!
Each recipe is for a 1000 g bread (the smaller option would be 750 g), so choose accordingly on your machine.

Farmhouse Bread 
(French Bread/#2 setting)

*360 ml water
*2 tsp salt
*500 g bread flour
*120 g rye flour
*2 tsp yeast

~*~

Wholemeal Loaf
(Wholemeal setting/#3)

*1 Tbsp (sunflower) oil
*360 ml water
*2 tsp salt
*1 Tbsp sugar
*300 g bread flour
*300 g whole wheat flour
*1.5 tsp yeast

~*~

Peasant Bread
(Wholemeal setting/#3)

*1Tbsp (sunflower) oil
*360 ml water
*2 tsp salt
*1 Tbsp sugar
*300 g bread flour
*150 g rye flour
*150 g whole wheat flour
*1.5 tsp yeast

~*~

Yogurt Bread 
(I've used it in my pre-vegan days with Greek yogurt and it was tasty! I'm sure it tastes good using soy yogurt!)
Setting is 'yogurt bread' 

*200 ml water
*125 g plain [soy] yogurt
*2 tsp salt
*1 Tbsp sugar
*480 g bread flour
*70 g rye flour
*2.5 tsp yeast

~*~
Basic white bread
(I never really use this as I prefer having at least some wholemeal flour in my bread -besides not having access to soy powdered milk here! )
Basic white bread setting/#1

*1.5 Tbsp (sunflower) oil
*300 ml water
*1.5 tsp salt
*1 Tbsp sugar
*2 Tbsp powdered (soy) milk
*550 g bread flour
*1.5 tsp

~*~
French Bread
(Never used it. French bread setting/#2)

*360 ml water
*2 tsp salt
*620 g bread flour
*2 tsp yeast

~*~

Pizza Dough
(Love it! Though I often do 50/50 white & whole wheat flour)
Pizza dough setting

*1.5 Tbsp olive oil
*320 ml water
*2 tsp salt
*640 g bread flour
*1.5 tsp

~*~


Enjoy! 


German Sourdough Bread

Last year, pretty much in the beginning of my vegan blogging, I've posted a few pics of my beloved bread, but I don't think I actually shared any recipes yet!? *oops*

Without further ado I'll get right to it, though bear with me, it'll be a somewhat lengthy recipe post! [It sounds like a lot of work, but trust me, once you've got the hang of it, it's so easy! I do this once a week!]

First step is to make a sourdough starter (which seems to differ a bit from the American way of making sourdough starters from what I've seen on the net!)

Here's how:

Sourdough Starter

Day 1. Mix 100 g rye flour* with 100 g/ml lukewarm water, cover with Saran wrap and let sit at room temperature for 24h.

Day 2. Add another 100 g rye flour and 100 g/ml lukewarm water to the mix from day 1, cover again and let sit for another 24h.

Day 3.  Add another 100 g rye flour and 100 g/ml lukewarm water, mix well, cover and let sit for 24h again.

Day 4. Your sourdough starter is now ready to be used! =)
 -
Hint!
* You can use any type of flour, rye, whole wheat, white.. I prefer using rye but have also used whole wheat. You'll learn to 'play around' a bit with the mix ratio. ;)
-
Since the starter will be quite a lot and you won't need so much, fill the rest in a glass jar, add water to cover the sourdough 'glob', close the lid (not too tightly though!) and put it in the fridge! It'll last there for months -as long as you keep 'feeding' it! [I'll get to that later!]

Now that you have your ready sourdough starter, we can move on to the recipe for one of my favorite breads! ;-)

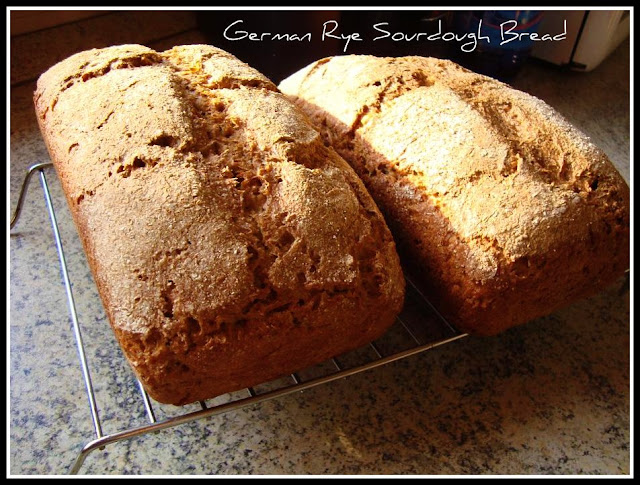
~* German Rye Sourdough Bread *~

Day 1.
*50 g of the sourdough starter
*280 g rye flour
*220 g/ml lukewarm water
Mix everything together, cover with Saran wrap and let sit at room temperature for 15-24 h.

Now you have 550 g sourdough which you'll only need 500 g of; the remaining 50 g go into the jar with the sourdough starter! [So you see, you keep adding more and more of the sourdough, each time you make a bread and have 'leftover'!]

Day 2. Ready to make your bread!

*500 g sourdough
*420 rye flour [can also be whole wheat!]
*300 g bread flour [or whole wheat]
*420-450 g/ml lukewarm water
*1-2 tsp salt
*bread spices [in Germany you can buy it in stores or simply make it yourself -recipe follows**]
*sunflower seeds (optional). -Must be soaked over night otherwise they suck the moisture out of the bread and you end up having a super dry bread! I usually soak the seeds in the 450 ml water I'm going to use as it automatically gives off more flavor!

Mix everything together, knead well, form a ball and let sit covered in a bowl for 30 minutes.
Afterwards mix the dough again (if still too sticky, add a bit more flour!), form a loaf and put in a bread form or 'rising basket [German 'Gaerkoerbchen'].
Now the loaf needs to sit and rise between 2-3 hours!
-
Hint!
The younger the sourdough starter, the longer it takes to rise!
You might even need to add a little bit of yeast to the first 1-2 batches of bread until the sourdough starter matured enough with his own yeast!
-
 Now that you've waited 2-3 hours, pre-heat your oven to 240 C (~450 F).
When the oven is ready at the desired temperature, put the bread in its form in the oven [or if you've used a 'rising basket', flip it gently on a baking tray and remove the basket!] and immediately spray the top with a spray bottle filled with water! 
[This method works best for me instead of putting a heat proof dish in the oven, filled with watenr, which is then supposed to give off steam!]

Close the oven after dousing the bread with a few spritzes of water and turn the temperature down to 200 C (~400 F).

Now the bread has to bake for a good full hour in which you'll do the water-spritzing routine at least 3x, so the top gets nice and crispy!

After 60 minutes (give or take, it depends on your oven and how brown the top of your bread is by then!) the bread is ready to be taken out! :)
[If you tap at the bottom -once it's out of the form!- and it sounds kinda hollow, the bread is done!]

Some say to immediately 'spray' the top of the bread with cold water to make the crust even crispier, but I mostly forget and still find the bread to be very crispy! ;)

Voila, there you go, your own authentic German bread! ^_^

These particular loaves were made from whole wheat sourdough starter and then with the ratio of 50/50 rye and bread flour.

One word of 'caution':
This bread not going to be fluffy as you might know any kind of bread made in your bread machine! It's really heavy and dense!


-
**Bread spice 
(This is what gives it the typical German bread flavor IMO!)

*2 Tbsp Fennel seeds
*2 Tbsp Caraway seeds
*2 Tbsp Anise seeds (1 only use 1 Tbsp)
*1 Tbsp Coriander seed

Mix the above in a coffee grinder (or similar item that grinds very fine) and put in a container tightly closed/sealed.
(I keep mine in the fridge!)

For a bread recipe of 500 g flour, one uses ~2 Tbsp of that bread spice mix! 
For white flour only a small pinch -if desired.
It's all a matter of taste in the end! ;)


~*~*~

Guten Appetit! =) 


Friday, March 23, 2012

TGIF! Time for a burger and a beer!

After having dealt with a sick kiddo who got a nasty stomach bug yesterday (gotta love those calls from school right in the middle of a sweaty workout! *lol*, followed by a rushed shower and in the end driving back home with a vomiting kid true Exorcist-style *shudder*),I'll admit, I'm glad it's Friday today! Evening for us here in Europe.. for those of you in the US and other parts in the world still daytime (or actually already early Saturday morning! ;) ).

Thankfully my Gremlin #2 felt better today and kept every liquid and food down, so tonight we actually had 'regular' dinner!
I made Lindsay's black bean burger (similar like this Black Bean Burger recipe on her siteand it was a success with Hubby, which is always a good sign! ;-)
The kids had chik'n nuggets and some tater tots and everyone was happy!


~*~*~

Wishing everyone a nice weekend! 


Thursday, March 22, 2012

Pizza Beans!

Another super quick meal that I don't even dare to say I have a 'recipe' for! =)

All you need is a can of lima beans (or pre-soaked & cooked ones, of course), a few tablespoons of pizza sauce, a few chopped black olives, done!
Mix all together, pour into a casserole dish and bake @ 350 F for 15 min.
I added some sprinkles of nutritional yeast on top as well as some chopped sun dried tomatoes, pronto! 


 I enjoy it with brown rice, but quinoa works just as well! ;-)

A little wisdom


Buddha had it right! 
 I know, I can totally apply this quote for myself in many ways; 
especially when it comes to my own perception of my body!
We're our own worst critics, naturally, but we need to be aware of just how critical we are!

Instead of talking ourselves down and focusing on the parts we don't like about ourselves, why not zone in on what we actually do like and get positive energy from that!?
Treat yourself kindly as you would a good friend! =)

~*~*~ 


And because it always makes me feel good when I eat a variety of fruit, 
here a little reminder for you! :)


Wednesday, March 21, 2012

The *best* Tomato Soup! Seriously!

Ok, I'll admit, of course everybody's got a different taste... but I have to say, for me personally the best (or worst?) critic besides Hubby is my picky son! If he eats something, I know I passed the test! *lol*
And this soup mastered it with flying colors! While it's so simple, I'm almost ashamed of even writing anything as a 'recipe'!

All you need is the following:

*1 big can (28 oz?) of diced tomatoes
*2-3 c veggie broth (or water -I prefer broth)
*1 onion, diced + 1-2 tsp minced garlic
*1 Tbsp coconut oil (olive oil will give this an entire different taste!)
*1/2- 1 Tbsp sugar or agave syrup
*1 Tbsp tomato paste
*Salt, pepper, oregano, other Italian spices

Now you simply sautee the onion & minced ginger in the coconut oil until the onions are nice and tender,
add the rest of the ingredients and let it simmer! 
Done!!! 

See how easy that was!?! =)

Of course the grilled 'cheez' sandwich is a must with that soup, for which I used a recipe from Vegan Vittles.
Since I'm not sure I can post her recipe without permission, you'll simply have to Google something yourself. There are tons of 'melty cheez' recipes out there!
One good source is VegWeb ;)

Tofu press the fit way! =)

For months I've been pressing my tofu with heavy cans until the other day it finally dawned on me! Why not use my dumbbells!!! =)
I didn't want to use more than the 5's, in order to not make the poor tofu completely flat *lol* but it worked great!
Just thought I'd put that idea out there in case you have a few DB's lying around as well and always look for the perfect weight to press your tofu! ;)


After the pressing was done (I go between 30 min to 2-3 hours, depending on how quickly I need/want the tofu to be available) I had a great lunch,
scrambled tofu the Mediterranean way with sun dried tomatoes and some black olives (the latter I just started eating recently! ;) ), some onion, garlic, turmeric and nutritional yeast, basta! =)
Together with some home made rye sourdough bread and fresh tomatoes it was amazing!!!


Speaking of trying olives... I'm not the only one! ^_^

I swear, this cat is semi the only cat that eats things like chickpeas, any other beans, brussel sprouts (!) and now olives!